


Here is a tutorial which will enable to change the looks and visual style of your Windows XP to Windows 7, Without using any Customization Pack.

UPDATE: If you want to download all BITMAPs, AVIs and other files mentioned in this tutorial in a single pack, you can download it using this link.
PS: Please create a Restore point using "System Restore" before applying anything mentioned in this tutorial so that you can restore your system back to default if you don't like the changes.
Also take a backup of system files before modifying them, so that you can restore them if anything goes wrong or you don't like the new change.
NOTE: If you are facing problems while saving a file after editing in resource hacker, then make sure you have disabled WFP (Windows File Protection) service using "WFP Patcher" or use "Replacer" to replace the file.
Windows File Protection (WFP) Switcher
Whenever you want to edit/delete/replace a system file in Windows XP, it doesn't allow and shows a message that the file is already in use. Even if you replace or edit the file using some other method, Windows automatically replaces the edited file with the default one upon next reboot.
It happens due to "Windows File Protection" (WFP) service which checks the system files periodically and replaces them with default ones.
Windows File Protection Switcher lets you disable and re-enable WFP service so that you can easily modify system files.
Replacer
Replacer is another easy way to replace system files with your modified one. Suppose you downloaded a patched or customized system file and you need to replace existing file in your system with the new one.
Using "Replacer", you can do it very easily and quickly. Just drag-n-drop the default system file in its window and then drag-n-drop the new modified file. It'll ask for confirmation, press "Y" and you have done. Restart your system and it'll replace the default file with new one upon next reboot.
PS: You can also type the complete file path in Replacer window instead of drag-n-drop the file.
Windows 7 provides lots of new features along with a newly designed interface. It looks very similar to Windows Vista but there are many GUI changes like redesigned taskbar, Explorer, new boot screen and login screen, etc.
If you are still using Windows XP but want to enjoy the new Windows 7 look, then this tutorial will definitely help you.
After following this tutorial, you'll get the same Windows 7 look in your Windows XP. Following is a list of things which are going to change after following this tutorial:
- Windows Theme or Visual Style
- Icons
- Boot Screen
- Login Screen or Welcome Screen
- Cursors
- Taskbar
- Wallpaper
- Sidebar
- Progress Dialog Box
- Shutdown / Log off Dialog Box
- About Windows Box
- System Properties Dialog Box
- A Few Other Mods...
So here we start our transformation tour:
1. Windows Theme or Visual Style:
Windows 7 provides a new refreshing look which includes redesigned taskbar and start menu, Windows Explorer and a few other small changes.
You can get the same look in Windows XP by using following theme:

2. Icons:
You can get Windows 7 icons in XP using "Seven Icon Pack":
You can download it using following link:
After downloading the file, extract it and you'll get a folder containing the Icon Pack. You'll need "Stardock Icon Packager" to apply this icon pack which you can find here.
Open "SevenVG.iconpackage" file in Icon Packager and Apply it.
3. Boot Screen:
Windows 7 contains a new animated boot screen which shows animated items/balls that come together to form Windows logo.
You can get a similar boot screen in Windows XP:

You Need to use Tuneup Utility to change the logon screen... (Download here)
4. Login Screen or Welcome Screen:
Windows 7 login screen looks similar to Vista login screen except the new background image and the text displayed at bottom.
Download the login screen from following link:
Dwonload Tuneup Utility and Use It to change your logon Screen. Its safe and easy.
5. Cursors:
Windows 7 cursors are also similar to Vista which you can download using following link:
6. Taskbar:
Windows 7 taskbar has been highly redesigned. It doesn't show opened program's name in their taskbar buttons, instead it only shows their icons. Also the taskbar buttons are a bit large in their size.
You can use following small utility (Download Link) or (Alternative Link)
7. Wallpaper:
You can get Windows 7 Desktop wallpaper using following link:
Download Wallpaper (via TheVista.Ru)
8. Sidebar:
Windows 7 comes with a cool Sidebar which is displayed on Desktop.
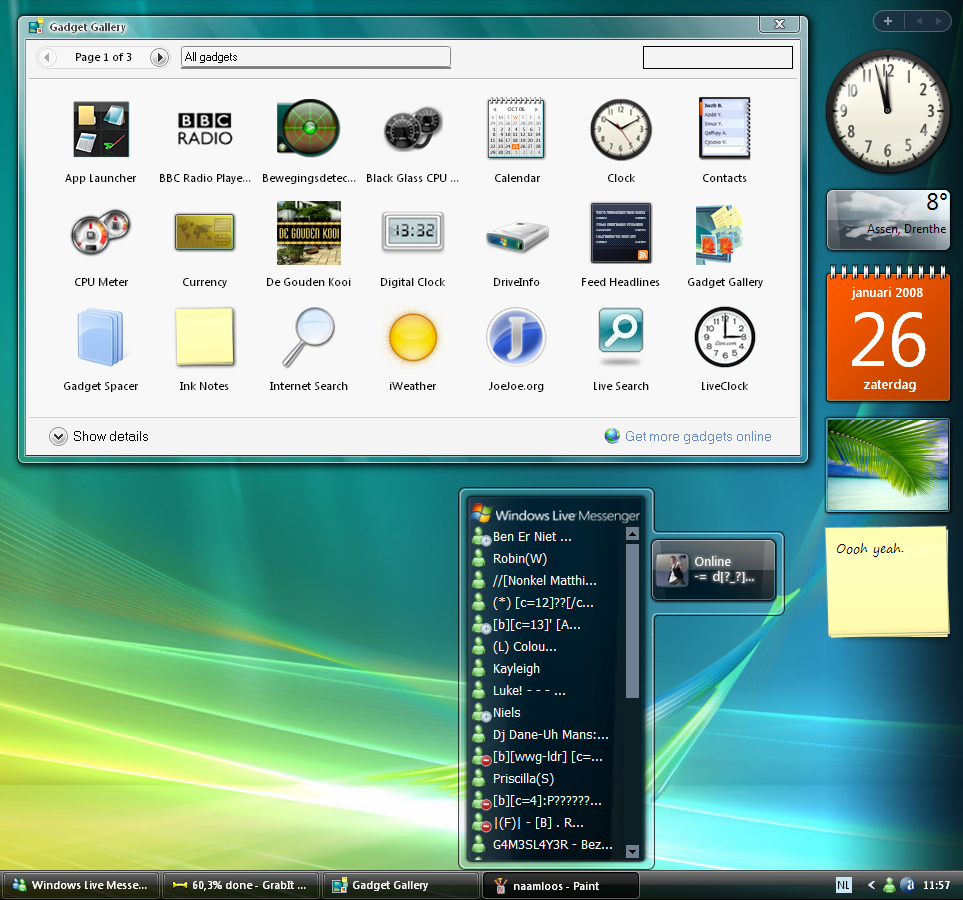
"joshoon" @ DA has ported the same Sidebar to XP which can be downloaded using following link:
9. Progress Dialog Box:
Windows 7 progress dialog box is different from XP. But we can make our XP dialog box to look-a-like Windows 7 by using Resource Hacker.

Just open "%windir%\System32\Shell32.dll" file in Resource Hacker and then go to:
Dialog -> 1020 -> 1033
Now replace the existing code in right-side pane with the following code:
1020 DIALOGEX 20, 20, 237, 134
STYLE DS_FIXEDSYS | DS_MODALFRAME | DS_NOIDLEMSG | WS_MINIMIZEBOX | WS_POPUP | WS_CAPTION | WS_SYSMENU
EXSTYLE WS_EX_APPWINDOW
CAPTION ""
LANGUAGE LANG_ENGLISH, SUBLANG_ENGLISH_US
FONT 8, "MS SHELL DLG"
{
CONTROL "", 106, "SysAnimate32", ACS_TRANSPARENT | ACS_AUTOPLAY | ACS_TIMER | WS_CHILD | WS_VISIBLE, 65532, 0, 236, 25
CONTROL "Location:", 0, STATIC, SS_LEFT | WS_CHILD | WS_VISIBLE | WS_GROUP, 10, 30, 31, 10
CONTROL "", 103, STATIC, SS_LEFT | SS_NOPREFIX | WS_CHILD | WS_VISIBLE, 70, 30, 155, 10
CONTROL "File name:", 0, STATIC, SS_LEFT | WS_CHILD | WS_VISIBLE | WS_GROUP, 10, 45, 33, 10
CONTROL "", 102, STATIC, SS_LEFT | SS_NOPREFIX | WS_CHILD | WS_VISIBLE, 70, 45, 155, 10
CONTROL "Time remaining: About", 0, STATIC, SS_LEFT | WS_CHILD | WS_VISIBLE | WS_GROUP, 10, 60, 83, 10
CONTROL "", 105, STATIC, SS_LEFT | SS_NOPREFIX | WS_CHILD | WS_VISIBLE, 93, 60, 155, 10
CONTROL "Speed: 10.2 MB/sec", 0, STATIC, SS_LEFT | WS_CHILD | WS_VISIBLE | WS_GROUP, 10, 73, 103, 10
CONTROL "", 104, "msctls_progress32", PBS_SMOOTH | WS_CHILD | WS_VISIBLE, 10, 88, 217, 10
CONTROL 404, 0, STATIC, SS_BITMAP | WS_CHILD | WS_VISIBLE | WS_CLIPSIBLINGS | WS_GROUP, 65530, 107, 267, 28
CONTROL "Cancel", 2, BUTTON, BS_DEFPUSHBUTTON | WS_CHILD | WS_VISIBLE, 177, 113, 50, 16
}
Click on Compile Script button.
You'll also have to replace existing AVIs in the file with new ones. Just download following ZIP file and extract it:
After extracting the ZIP file you'll get 3 AVI files and 1 BMP file. Replace existing AVIs in shell32.dll file with these new ones in following manner:
AVI -> 160 ->1033 with 160.avi
AVI -> 161 ->1033 with 161.avi
AVI -> 162 ->1033 with 162.avi
AVI -> 163 ->1033 with 162.avi
AVI -> 164 ->1033 with 162.avi
AVI -> 161 ->1033 with 161.avi
AVI -> 162 ->1033 with 162.avi
AVI -> 163 ->1033 with 162.avi
AVI -> 164 ->1033 with 162.avi
Now add the 404.bmp file at 404 location in file. Just click on Action -> Add a new resource and then click on Open file with new resource button. Select the downloaded BMP file and click on Open. Now in Resource Name enter 404 and in Resource Language enter 1033 and click on Add Resource button. That's it.
10. Shutdown / Log off Dialog Box:
Windows 7, similar to Vista, doesn't have any shutdown / log off dialog box but we can redesign Windows XP default shutdown box to make it more refreshing like following screenshot:

Download required BMP files from here:
Extract the file and you'll get 4 BMPs with the name:
1.bmp
2.bmp
3.bmp
4.bmp
Now open "%windir%\System32\Shell32.dll" file in Resource Hacker and then replace following BITMAPs with the mentioned BMP files:
Bitmap -> 14351 -> 1033 with 1.bmp
Bitmap -> 14353 -> 1033 with 2.bmp
Bitmap -> 14354 -> 1033 with 1.bmp
Bitmap -> 14355 -> 1033 with 2.bmp
Bitmap -> 14356 -> 1033 with 3.bmp
now save the file and open %windir%\System32\msgina.dll file in Resource Hacker and then replace following BITMAPs with the mentioned BMP files:
Bitmap -> 20140 -> 1033 with 1.bmp
Bitmap -> 20141 -> 1033 with 2.bmp
Bitmap -> 20142 -> 1033 with 1.bmp
Bitmap -> 20143 -> 1033 with 2.bmp
Bitmap -> 20150 -> 1033 with 4.bmp
Now save the file.
11. About Windows Box:
To change the About Windows box you'll need to change 2 things: The top logo and the text part.

Download the required BITMAP file from here:
Open "%windir%\System32\Shell32.dll" file in Resource Hacker and then replace following BITMAPs with the downloaded BMP file:
Bitmap -> 131 -> 1033 (For XP Professional)
Bitmap -> 147 -> 1033 (For XP Home)
Now open %windir%\System32\msgina.dll file in Resource Hacker and then replace following BITMAPs with the downloaded BMP file:
Bitmap -> 101 -> 1033 (For XP Professional)
Bitmap -> 107 -> 1033 (For XP Professional)
Bitmap -> 128 -> 1033 (For XP Home)
Bitmap -> 129 -> 1033 (For XP Home)
Now to change the text of dialog box, open "%windir%\System32\xpsp1res.dll" file in Resource Hacker and then goto:
Dialog -> 14352 -> 1033
Now replace the existing code in right-side pane with the following code:
14352 DIALOGEX 20, 20, 275, 198
STYLE DS_FIXEDSYS | DS_MODALFRAME | WS_POPUP | WS_CAPTION | WS_SYSMENU
CAPTION "About %s"
LANGUAGE LANG_ENGLISH, SUBLANG_ENGLISH_US
FONT 8, "MS Shell Dlg"
{
CONTROL 0, 12297, STATIC, SS_ICON | WS_CHILD | WS_VISIBLE, 7, 55, 21, 20
CONTROL "Microsoft %s", 13568, STATIC, SS_LEFTNOWORDWRAP | SS_NOPREFIX | WS_CHILD | WS_VISIBLE, 35, 55, 200, 10
CONTROL "Copyright (c) 2009 Microsoft Corporation. All rights reserved.", 13578, STATIC, SS_LEFT | SS_NOPREFIX | WS_CHILD | WS_VISIBLE, 35, 75, 210, 10
CONTROL "", 13581, STATIC, SS_LEFT | SS_NOPREFIX | WS_CHILD | WS_VISIBLE, 35, 85, 180, 20
CONTROL "This product is licensed under the Microsoft Software License Terms to:", 13586, "SysLink", 0x50000000, 35, 105, 180, 20
CONTROL "user name", 13575, STATIC, SS_LEFT | SS_NOPREFIX | WS_CHILD | WS_VISIBLE, 45, 125, 180, 10
CONTROL "org name", 13576, STATIC, SS_LEFT | SS_NOPREFIX | WS_CHILD | WS_VISIBLE, 45, 135, 180, 10
CONTROL "", 13095, STATIC, SS_ETCHEDHORZ | WS_CHILD | WS_VISIBLE, 35, 147, 235, 1
CONTROL "Physical memory available to Windows:", 13570, STATIC, SS_LEFT | SS_NOPREFIX | WS_CHILD | WS_VISIBLE, 35, 152, 133, 10
CONTROL "", 13571, STATIC, SS_LEFT | SS_NOPREFIX | WS_CHILD | WS_VISIBLE, 170, 152, 88, 10
CONTROL "OK", 1, BUTTON, BS_DEFPUSHBUTTON | WS_CHILD | WS_VISIBLE | WS_TABSTOP, 220, 178, 50, 14
CONTROL "Version 6.1", 0, STATIC, SS_LEFTNOWORDWRAP | SS_NOPREFIX | WS_CHILD | WS_VISIBLE, 35, 65, 235, 10
}
Click on Compile Script button and save the file.
12. System Properties Dialog Box:
To make System Properties dialog box look like Windows 7 one, visit following tutorial:
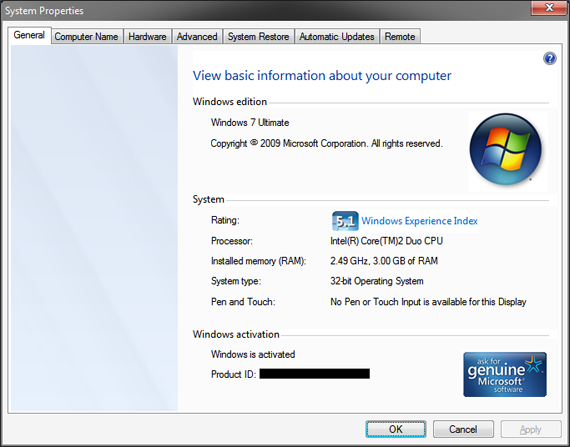
You'll need to replace existing sysdm.cpl file present in %windir%\System32\ directory with this downloaded one. (Here "%windir%\ represents "C:\Windows" directory if your Windows is installed in C: drive). You can use "Replacer" to replace the file.
15. A Few Other Mods:
1. Windows 7 explorer is quite similar to Vista and shows the same small horizontal progress bar under each drive icon for the drive space.
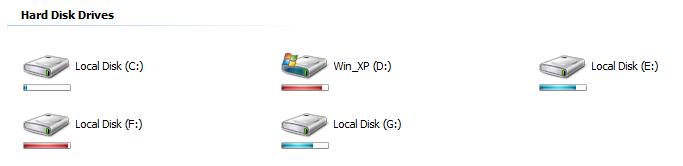
You can also get the same in XP by using a 3rd party utility:
Just run the file and it'll add the progress bar under each drive.
Source: Askvg

0 comments:
Post a Comment